Category Archives: Uncategorized

Simulate a Xilinx project with Questa sim simulator

I normally used to simulate my Xilinx projects with Isim simulator. When the Project is heavy its bit difficult to debug with primary Isim simulator. I moved to  Questa sim simulator which is a very advanced simulator for HDL projects verification provided by Mentor graphics. This is an advanced version of usual Modelsim simulator.

After installing Questa sim, you need to provide the license file using an environment variable.

Go to Control panel -> system and security -> system -> advanced system settings and click the button Environment variables. Click the New button under user variables in order to create a new environment variable. Fill up the following values in the pop up window and click ok.

Variable Name: LM_LICENSE_FILE

Variable Value: <path to your licence file>

Start the Questa sim simulator and you can see that its working fine.

Now it’s time to configure Xilinx project to use Questa sim simulator. I must thank my colleague Geethan Karunarathne for helping me on this.

Continue reading Simulate a Xilinx project with Questa sim simulator
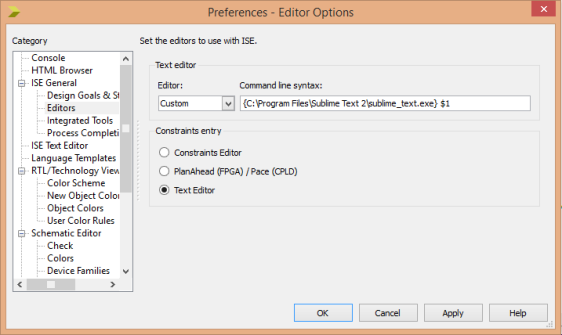
Select the custom editor for verilog in Xilinx as Sublime Text

I normally used to edit my Xilinx verilog projects in the ISE editor itself. But my favorite editor for all the programming stuffs is Sublime text. I wanted to edit my verilog files also in Sublime text. Here is the procedure which I followed.

1. Go to Edit -> Preferences and select Editors under the category of ISE general. 

2. Select custom in the Editor combo box and Add {C:\Program Files\Sublime Text 2\sublime_text.exe} $1 to Command line syntax field as shown in the figure below.

xilinx_custom_editor

Continue reading Select the custom editor for verilog in Xilinx as Sublime Text

Fixing the Xilinx compatibility issue in Windows 8.1

I installed the Xilinx ISE on Windows 8.1 and run the ISE. Unfortunately, Open project and Manage license properties are crashing very badly. I got to know that this happens due to a compatibility issue of Xilinx on Windows 8.1. Finally, I found the you tube video which describes how to fix that problem, thanks to my colleague Manupa Karunarathne.

What I have to do here is that simply changing some .dll files as follows.

First go to C:\Xilinx\14.7\ISE_DS\ISE\lib\nt64 and find the file libPortability.dll and change it to libPortability.dll.orig to keep it as a backup. Then find the file libPortabilityNOSH.dll file at the same location and make a copy of it to the same directory. Change the name of the new copy to libPortability.dll. After that, copy the libPortabilityNOSH.dll to C:\Xilinx\14.7\ISE_DS\common\lib\nt64 as well. A libPortability.dll file can be found in that new location too. Change that also to libPortability.dll.orig first and then change back the newly copied libPortabilityNOSH.dll  to libPortability.dll. That’s all.

Run your newest Xilinx ISE on Windows 8.1 and enjoy all the features.


Install Ubuntu 14.04 alongside with Windows 8.1

I installed windows 8.1 on my new laptop PC in legacy mode and allocated a separate partition for my other favorite operating system Ubuntu. But when I try to install Ubuntu 14.04, the partition table is not shown correctly and shows the whole space of the disk as free space. I opened Gparted partition editor in Ubuntu and checked as well but the result is same. Moreover,  in the Gparted, a message is shown complaining about GPT partition table. As per my knowledge, after searching through few forums, I found that the GPT(GUID partion table) is corrupted or something and we need to remove that. Then I used the following command thanks to this forum. You need to replace sda with your device name which appeared in the installation table.

sudo sgdisk --zap /dev/sda

Surprisingly, now the partition table is shown correctly on my Ubuntu installation. Then I installed the Ubuntu 14.04 in the usual way. After the installation I restarted the PC and the boot-up is appeared with the usual Ubuntu grub having Ubuntu 14.04 installation alongside with windows 8 loader.

If you use UEFI system instead of legacy mode, The procedures may be little bit different but I have no experience about that.