I normally used to simulate my Xilinx projects with Isim simulator. When the Project is heavy its bit difficult to debug with primary Isim simulator. I moved to Questa sim simulator which is a very advanced simulator for HDL projects verification provided by Mentor graphics. This is an advanced version of usual Modelsim simulator.
After installing Questa sim, you need to provide the license file using an environment variable.
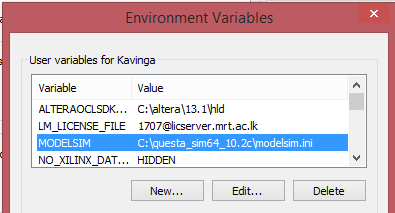
Go to Control panel -> system and security -> system -> advanced system settings and click the button Environment variables. Click the New button under user variables in order to create a new environment variable. Fill up the following values in the pop up window and click ok.
Variable Name: LM_LICENSE_FILE
Variable Value: <path to your licence file>
Start the Questa sim simulator and you can see that its working fine.
Now it’s time to configure Xilinx project to use Questa sim simulator. I must thank my colleague Geethan Karunarathne for helping me on this.
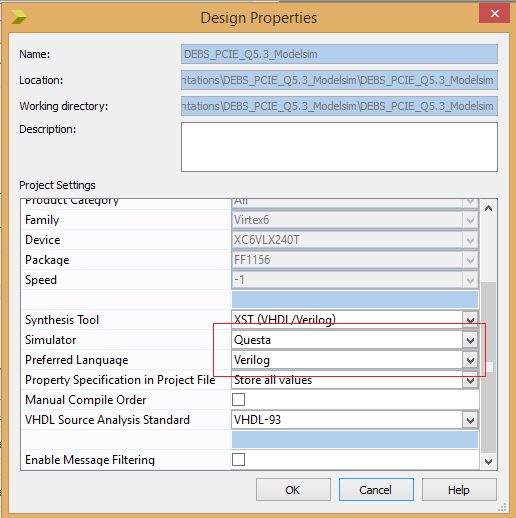
First of all you need to configure the design properties of the Xilinx project to use Questa sim as the simulator and prefered laguage which I used is verilog. Go to Project -> design properties and change change simulator to Questa as shown in the following figure.
Then Go to Edit -> preferences and select the Integrated tools under ISE general category. Add your questasim.exe path to Model Tech simulator field and click ok.
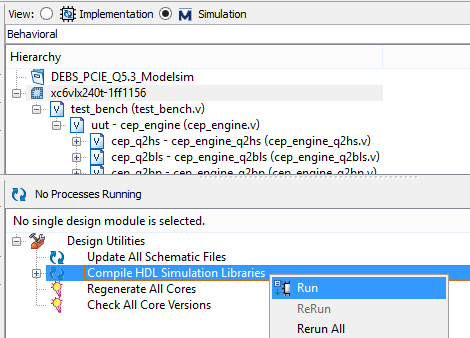
 Now select the simulation tab of your Xilinx project menu and run the Compile HDL Simulation Libraries. You need to do this only once to build the Xilinx simulation libraries required by Questa sim.
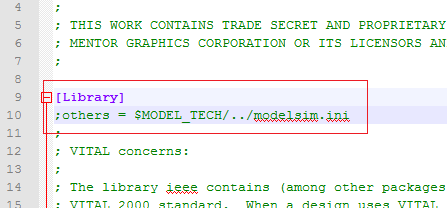
After the completion of this task, replace the modelsim.ini file at C:\questa_sim64_10.2c by the newly created modelsim.ini file at C:\Xilinx\14.7\ISE_DS\ISE\verilog\questasim\10.2c\nt64. Then open the new modelsim.ini file and comment the line as shown in the following figure.
You need to create another environment variable called MODELSIM pointing to the modelsim.ini file.
 Then go to Process -> properties after selecting your test bench file at the simulation file hierarchy. Make sure that Compiled Library Directory is configured by the proper value and Ignore Simulator / Compiled Library version check box is checked.

 Now you can run the simulation and the Questa sim simulator will be automatically opened.

That’s it, enjoy simulating your Xilinx projects using Questa sim advanced simulator. 🙂

Nice Details guys……….. Thanks helps me a lot……………….
Further one may get the error while simulation:-
When I run simulation in ModelSim, the following errors occur:
# ** Error: Library std not found.
# ** Error: VHDL Compiler exiting
# C:/modeltech_pe_6.5c/win32pe/vcom failed.
To resolve that please refer to below link:-
http://www.xilinx.com/support/answers/43003.html
Thanks & Regards,
Amey Telang
Thanx, you made my work simple. a useful tutorial.
I followed all the steps , my xilinx version is 14.6, compile was also successful but im not getting last step option to disable “Ignore simulator/complied Library version check”
when i run it gives error messages as Mismatch
Please help me to resolve this problem.
Hi,
My Xilinx version is 14.6, i have followed all the steps , but the last step ” Ignore Simulator / Compiled Library version check box ” is not showing xilinx.
when i try to simulate program it shows as “Simulator version mismatch!”.
Make sure the Property display level drop down box of the Process Properties window is set to advanced or you won’t be able to see that Ignore Simulator/Compiled Library Version Check